Monitor and Measure Site Performance from Time to Time and Automatically using Speedlify
November 7, 2020 - 7 min read | 33 views
TL;DR
Want to measure and monitor your site performance from time to time and automatically? Deploy Speedlify through Netlify and use Github Actions (cron schedule) or Zapier to automatically trigger build every desired time.
You can directly visit this page if you know what to do next. But if you need some guidance, this article will help you step by step.
What will be covered in this article?
- How to configure Speedlify
- How to deploy Speedlify
- Using Netlify build hooks and Github Actions to automatically trigger build Speedlify page every desired time.
This article won't cover...
SEO or visitor related metrics like Google Analytics. The site performance mentioned in this article is Lighthouse based performance measurement.
Measuring Site Performance
Nowadays there are so many ways to measure site performance beside running lighthouse in your local machine (Chrome Dev Tools). Even recently Vercel, PaaS for frontend deployment released a feature called Analytics. This feature can show your Next.js or Gatsby site performance automatically from time-to-time without having to configure anything (almost zero-config). But this feature is limited to be applicable for one project if your vercel account is a free version.
What if we have more than one project / site to be measured from time-to-time without spending extra cost? Well, this is where Speedlify comes in, a template for site performance monitor created by Zach Leatherman. Speedlify built using a static site generator framework called 11ty(eleventy).
I've tried to deploy my own speedlify here.
fun fact: I found Speedlify when I was just randomly exploring 11ty docs page (not really important, just intermezzo 😄)
Well, let's get our hands dirty!
How?
What is needed?
- a Github account
- a Netlify account
This Guide was Written with Assumtions that You:
- know how to use basic Git commands
- familiar with Netlify
- familiar with Node.js environment (installed node and npm)
I suggest you to visit Speedlify to get some glimpse on what we will be using. There's a link to the source code repository on that page which shows you how to deploy your own Speedlify page. However, if you are having some difficulties, you can folow these steps:
#1: Clone Speedlify Repo
Import speedlify repository to your github account (https://github.com/new/import),
input this URL: https://github.com/zachleat/speedlify/.
After the import process is done, clone your speedlify repo into your local machine or just run these command below in your local folder:
gitgit clone https://github.com/[YOUR_GITHUB_USERNAME]/speedlify/
bashcd speedlify
Then, run npm install or npm i.
#2: Configure URLs
Open _data/sites folder. Every file you create here will represent a category. You can defined more than one URL for every category.
Just delete all default files in _data/sites. Create a file [CATEGORY_NAME].js. (change [CATEGORY_NAME] with your desired category name). You can create more than one category, but you must know some limitations here: https://github.com/zachleat/speedlify/#known-limitations
js// _data/sites/[CATEGORY_NAME].js module.exports = { name: 'Category Name', // optional, falls back to object key description: 'Category Description', options: { frequency: 60 * 23, // 23 hours // Use "run" if the sites don’t share assets on the same origin // and we can reset chrome with each run instead of // each site in every run (it’s faster) // Use "site" if sites are all on the same origin and share assets. freshChrome: 'run', }, urls: [ 'https://[YOUR_SITE_URL]/', 'https://[YOUR_SITE_URL]/', // etc ], };
explanations
optionsfrequency: to set minimum time needed before next measurement. If we set60*23(1380 minutes or 23 hours) it means we will be measuring our site performance once every 23 hours. This value will be used to avoid measurement more than once before the minimum time was passed which will affect the build time. If we set the frequency to 23 hours and trigger build every 6 hours, the measurement for this category will be skipped if the last measurement haven't passed 23 hours.
#3: Test run in local
Run npm run start. If the categories you input are shown, you can continue to the next step. You won't see any measurements. Measurements will be done at the build time when we deploy your Speedlify to Netlify.
Commit your changes and run git push to apply changes to your github repository.
#4: Deploy configured Speedlify through Netlify
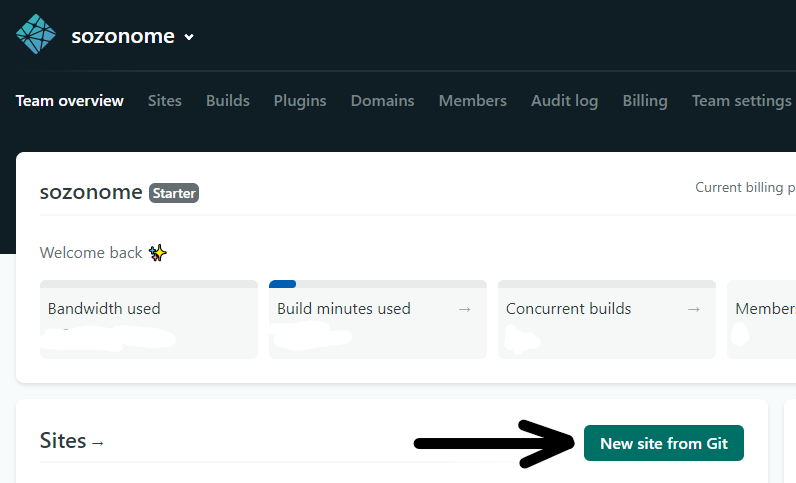
Open your Netlify dashboard (https://app.netlify.com/), click "New site from Git". Point it to your Speedlify repository.

Confirm the build configurations until "Deploy Site" button is shown and click that button. Netlify build will do the build and deployment process. If the build and deployment process are successful, you can preview your deployment.
The measurement page will look like this:

#5: Configure Github Actions to Automatically Trigger Build Every Desired Time
To do measurement from time-to-time, we will utilize Netlify build hooks and Github Actions. Why? Because measurement are only done on build time. It will be a hassle to trigger the build process manually. You don't have to use Github Actions if you prefer to use Zapier or similar services which support cron schedule. The same process can be achieved using Zapier with Schedule by Zapier and Webhooks by Zapier. However for the time being Webhooks by Zapier can only be enabled if you are a Zapier premium user. Therefore, in this guide I will use Github Actions as an alternative which are more friendly to our pocket.
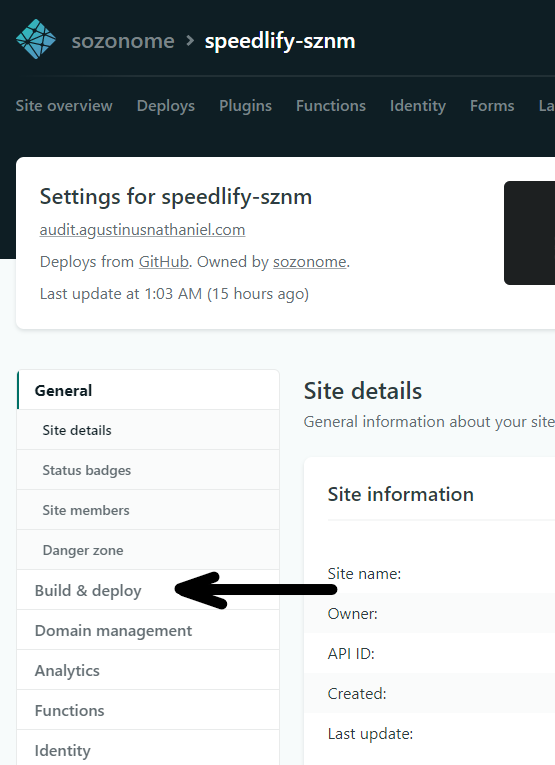
We will need build hook link (webhooks) to trigger build in Netlify. To get that link, open your speedlify project in your Netlify dashboard, then open "Site settings". Open "Build & Deploy".

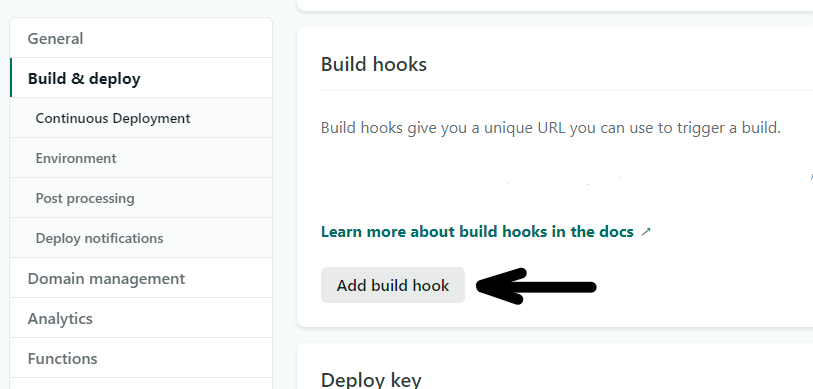
Then point to "Build hooks", click "Add build hook".

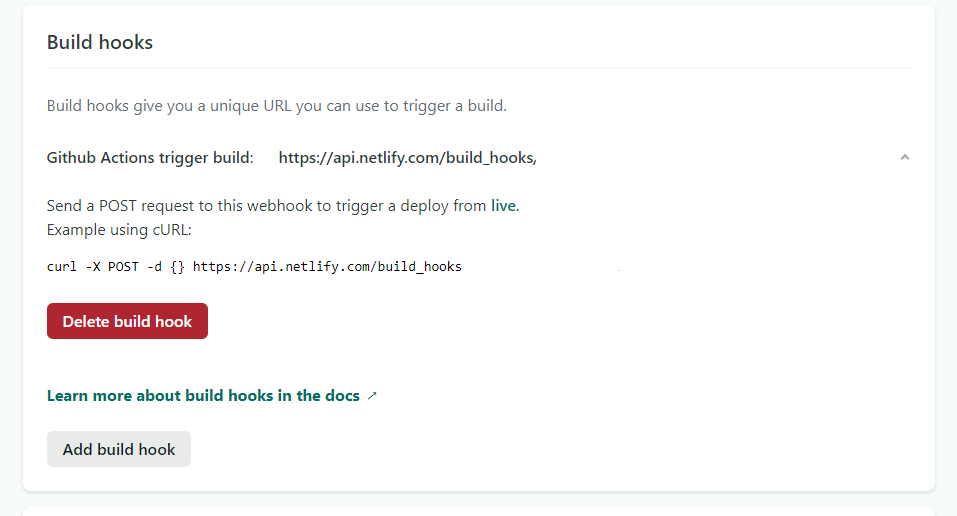
We will get the build hooks URL, copy that link.

Now we can configure Github Actions to automatically trigger build to Netlify. Go back to your speedlify local folder, add a file named .github/workflows/main.yml and paste the copied build hooks URL into this file:
yml# .github/workflows/main.yml # edit according to your needs name: Trigger Netlify Build daily on Weekday on: schedule: # if you want to define your own build trigger schedule, just change the cron schedule value below # use https://crontab.guru/ if you are having some difficulties on how to define the cron values - cron: '0 22 * * MON-FRI' # every day on weekdays 22:00. jobs: build: name: Netlify build runs-on: ubuntu-latest steps: - name: Curl request run: curl -X POST -d {} YOUR_BUILD_HOOK_URL
Commit your changes and run git push. If it's configured correctly, it will be shown in "Actions" tab at your github repository.
Now you have a dedicated page to monitor your site performance from time-to-time and automatically updated.
Limitations
It's important to note that the more URL you add to your speedlify configurations, the build time needed will be increased. The free version of Netlify have a maximum 15 minutes build time for every build process and 300 minutes build time quota for every month.
I work around it by limiting my measurement to be done maximum once every 23 hours and limiting the total URLs from all category to be around 5 until 10, and automatically trigger the build every day on weekdays only at 10PM. With those configurations, every build would spend around 4 until 7 minutes (<15 minutes), so I won't hit the monthly build time quota limit (4.5 x 5 x 7 ~= 160 minutes -> <300 minutes).
Thank You!
For reading this article. I hope you found this useful.
References
- https://www.speedlify.dev/
- https://github.com/zachleat/speedlify/#deploy-to-netlify
- https://github.com/zachleat/speedlify/#known-limitations
- https://www.zachleat.com/web/speedlify/
Some Alternatives
(some exhaustive list of other tools to measure your website performance)